|
|
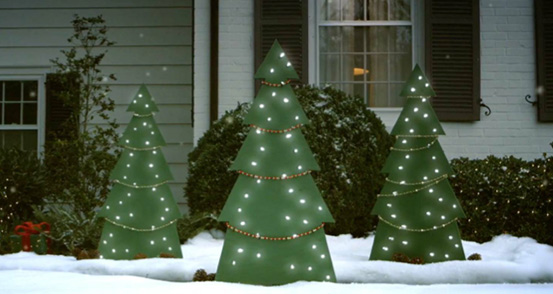
HOLIDAY TREE YARD DECOR |
MATERIALS
- 2' x 4' x 1/2" thick pressure-treated plywood panel
- 8' long 2x4
- 1 gallon BEHR Ultra Premium-Plus® Satin Enamel Paint or BEHR® Premium Natural Transparent Weatherproofing Wood Finish
- 35-Light LED Pure White Ice Mini Light set
- Electrical cord staples
- One box of #10, 3" Phillips flat-head deck screws
TOOLS
- Circular saw
- Jigsaw
- Sander
- Drill/driver with drill bits
- Paint brush
- Hammer
- Sledgehammer
- Straight edge
- Pencil
- Safety goggles
STEP 1
MAKE A PLAN
Start by marking an outline of your tree on the plywood. Download the tree template from www.homedepot.com/letsdothis or make your own design.
STEP 1A
JOIN THE WREATHS TOGETHER
Use the Hobby wire to join the three wreaths together for a more secure support by wrapping the wire tightly around the two adjoining wreaths to create the trio shape.
STEP 2
CUT OUT YOUR TREE
Use a circular saw for larger, straight cuts, and a jigsaw for curves or finer cuts. Be sure to stay clear of the table edge when cutting. Sand any rough edges of the plywood.
STEP 3
CUT AND ATTACH YOUR POST
Cut the 2x4 about 2" longer than the total height of your tree. Cut the bottom into a point to make it easier to drive into the ground. Starting about 8" below the top of the tree, align it down the center on its edge, extending below the bottom. Attach from the front with 3" deck screws.
STEP 4
DRILL THE HOLES
Work from the back side. (TIP: Use a little tape to lay out your pattern, then mark the holes with a pencil.) Use a small drill bit to make pilot holes from the back side. Then choose the right drill bit that will accommodate your bulb size, and drill the final holes from the front side to minimize splintering. Smooth the edges with a sander.
STEP 5
PAINT OR STAIN
Now, paint or stain your tree. Use two coats. Let dry completely before proceeding.
STEP 6
ADD LIGHTS
Insert the lights through the pre-drilled holes from the back, and use staples to secure the wiring to the back of the tree. (TIP: Prop up your tree with scrap 2x4s so your lights can poke through without damaging the bulbs.)
STEP 7
PLACE YOUR TREE
Find a great spot for your tree, then use a sledgehammer to drive the post into the ground. (TIP: Don't strike the post directly. Use a scrap piece of 2x4 as a buffer, and you won't damage the post.)
STEP 8
FINISH DECORATING
Add some final touches to your Holiday Tree Yard Decor using garland or ornaments, and you're all set for the holidays.