|
|
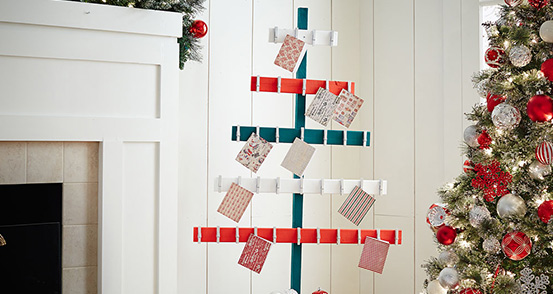
CHRISTMAS CARD HOLDER |
MATERIALS
- 2 - 1"x 3"x 8' Furring Strip Board
- 1 - 2"x 2"x 8' Furring Strip Board
- 1 - Pack of Small Wood Screws
- 1 - 50 Pack of Clothes Pins
- Hot Glue Sticks
- Command Hook
- Picture Hanger
OPTIONAL MATERIALS
- Red, Green, White and Silver Paint
- Paint Brushes
- D Ring
- Latex Gloves
- Large Wooden Crate 18" x 12 1/2" x 9 1/2"
NOTE: Display options for your Christmas Tree Card Holder are outlined in steps 6 and 6A. If you choose to hang your tree, we suggest purchasing a 2 pack of 20 lb steel D Rings and an 8 pack of 20 lb. steel brass plated conventional picture hooks.
TOOLS
- Drill
- Table or Circular Saw
- Hot Glue Gun
- Tape Measure
- Pencil
- Safety Goggles
STEP 1
CUT THE TREE BRANCHES
First measure and cut the 1"x3"x8' into the following lengths.
- Branch one = 12 inches
- Branch two = 18 inches
- Branch three = 24 inches
- Branch four = 30 inches
- Branch five = 36 inches
STEP 2
CUT THE TREE TRUNK
Next cut the 2"x 2"x 8' down to 60 inches. This piece will be used as the trunk.
STEP 3
PAINT OR STAIN THE TREE
Now that all of the wood has been cut, it's time to paint or stain all of the pieces. Allow paint/stain to dry completely before moving on to the next step.
STEP 4
ATTACH THE BRANCHES
Next take the five branches and pre-drill a hole into the center of each. Space the branches 6 inches apart starting 4 inches from the top.
STEP 4A
Screw the branches into the center trunk using the small wood screws.
STEP 5
ADD THE CLOTHES PIN HANGERS
Start the first pins one inch from the edge and then evenly space the next clips with 4 inch gap in between. Apply a small bead of hot glue to attach each pin to the branches and allow to dry.
STEP 6
DISPLAYING THE TREE
For a standing tree, screw the base of the tree to the side of the inner wall of the crate.
STEP 6A
For a hanging tree, screw the two 20 lb. Steel D-Ring Hangers into the back of the tree trunk then hang using the command hook.